In today’s digital age, using a VPN (Virtual Private Network) is essential for secure and private internet browsing. While there are many VPN options available, ZIVPN stands out for its support of the UDP protocol, which offers both speed and security. In this guide, we’ll walk you through setting up a custom UDP server on ZIVPN, ensuring you get the most out of this powerful VPN service.
Table of Contents
- Install ZIVPN from the Google Play Store
- Launch ZIVPN
- Access the UDP Custom Website
- Navigate to Premium UDP Servers
- Select a Server Location
- Create an Account
- Configure ZIVPN Settings
- Access UDP Tunnel Settings
- Enter Server Details
- Connect ZIVPN
- Conclusion
- FAQs
Install ZIVPN from the Google Play Store
To begin, you need to install the ZIVPN app on your Android device. Open the Google Play Store on your device and type “ZIVPN” in the search bar. From the search results, select the ZIVPN app and tap “Install.” Wait for the app to download and install on your device. Once the installation is complete, you are ready to move on to the next step.
Launch ZIVPN
After the installation is complete, open the ZIVPN app. You will be greeted by the home screen of the app. Before we proceed with setting up the custom UDP server, we need to create the server. This requires visiting a specific website that allows you to create a custom server tailored to your needs.

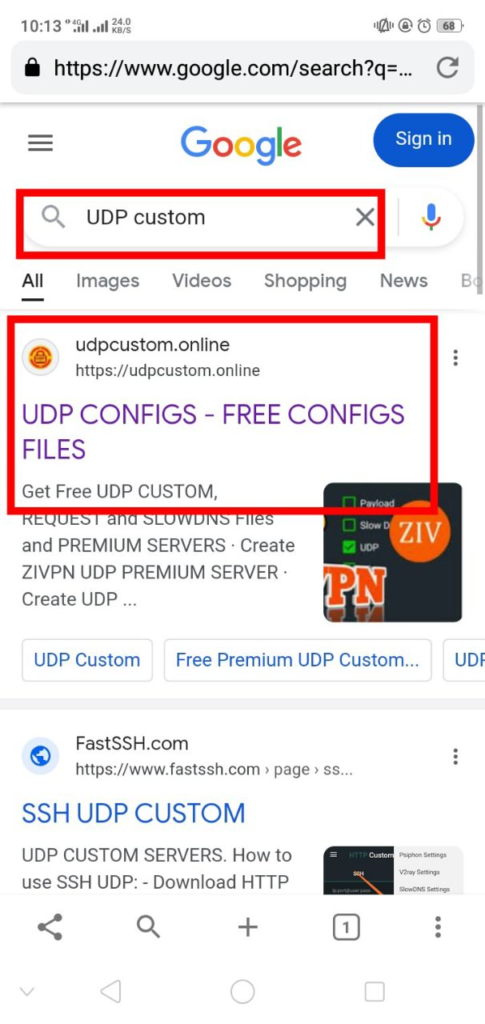
Access the UDP Custom Website
To create a custom UDP server, open any web browser on your device and type “UDP CUSTOM” in the search bar. Click on the official UDP Custom website from the search results, and you will be redirected to their homepage. This site will provide you with the necessary tools to create your custom server.
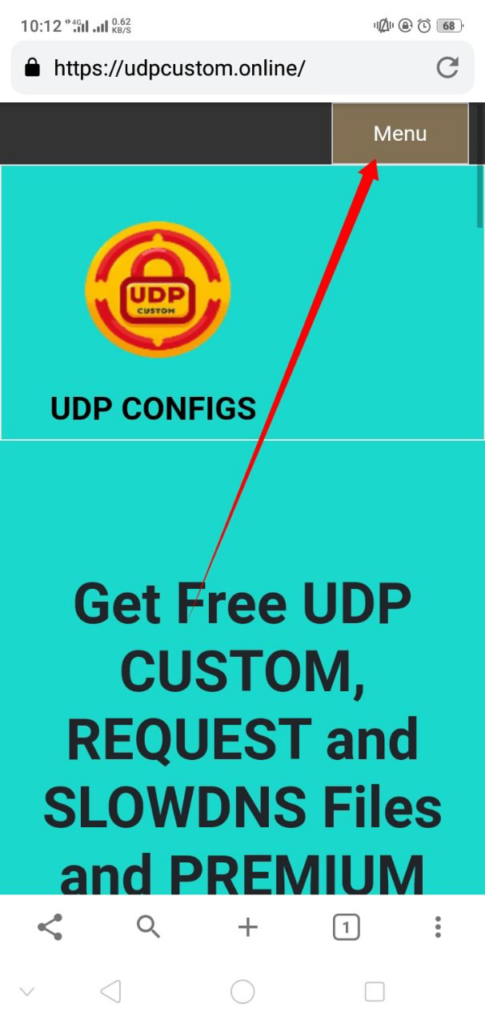
Navigate to Premium UDP Servers
Once you are on the UDP Custom website homepage, look for the menu icon located at the top right corner of the screen and click on it.
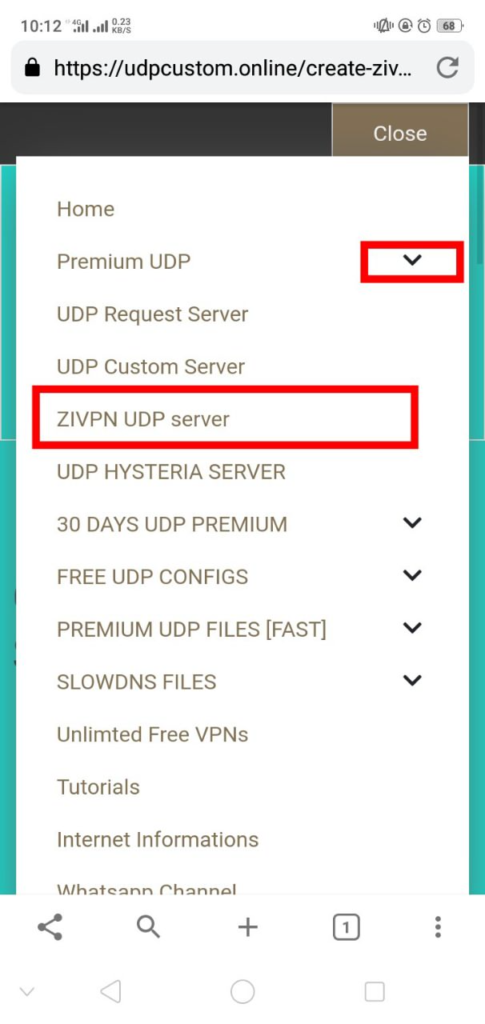
A dropdown menu will appear. From this menu, select “Premium UDP,” and then in the sub-menu that appears, click on “ZIVPN UDP server.” This will take you to the server configuration page.
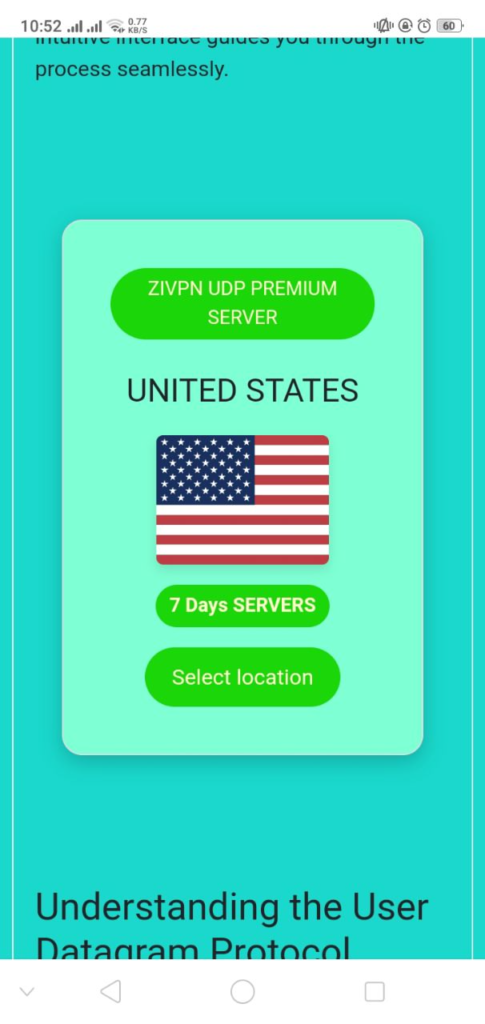
Select a Server Location
On the server location selection page, choose a location that best suits your needs. Server location can impact your connection speed and latency, so pick a location that is geographically close to you for optimal performance. Once you have made your selection, click on the “Select Location” button to proceed.
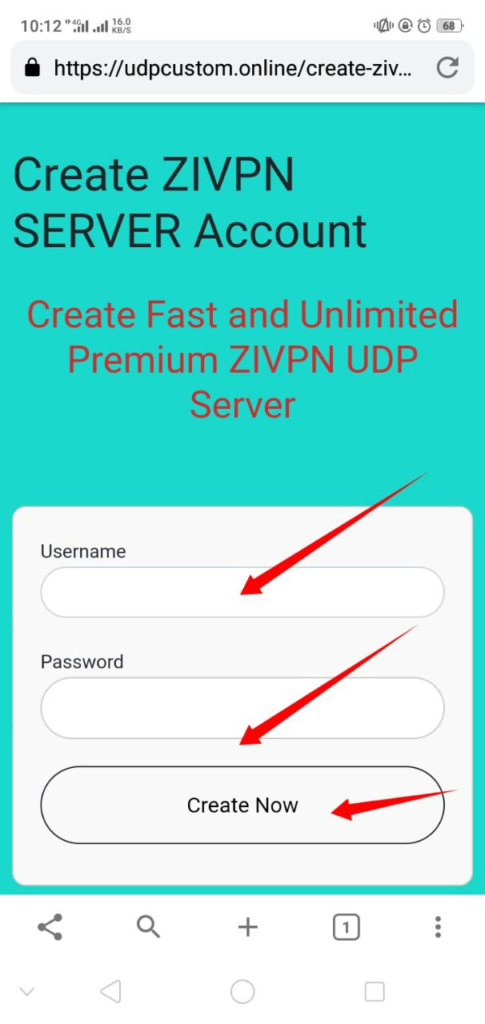
Create an Account
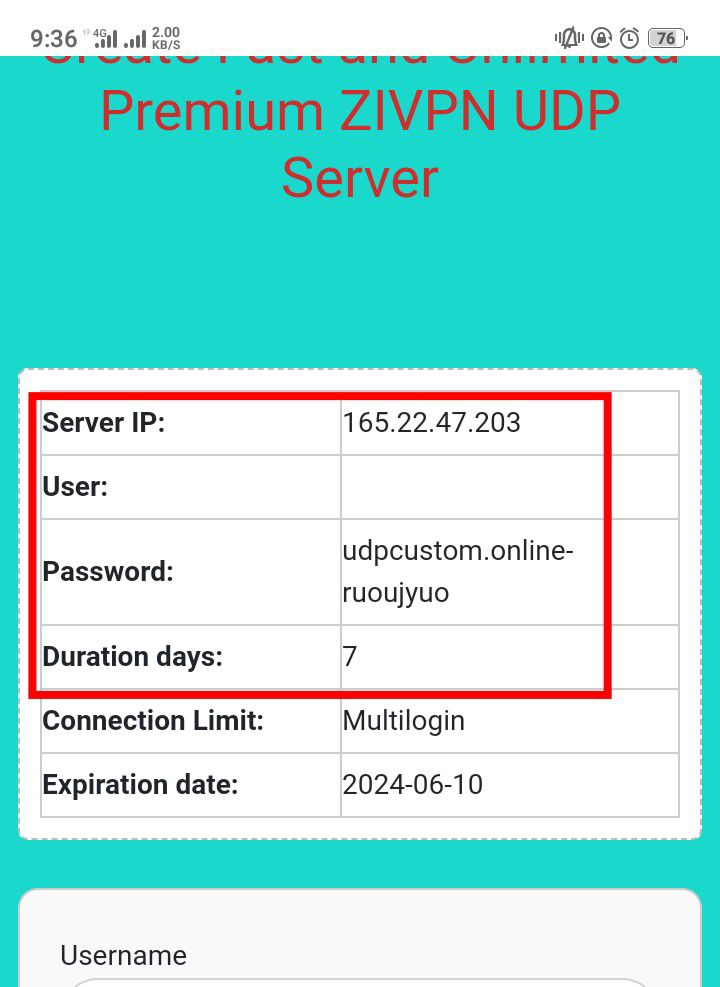
To use the premium server, you need to create an account on the UDP Custom website. Fill out the account creation form by entering a username and password. After filling out the form, click on the “Create Account” button. Wait a few moments for the server to be created.
Once the server is ready, copy the server details including the IP address, username, and password. These details are crucial for the next steps.
Configure ZIVPN Settings
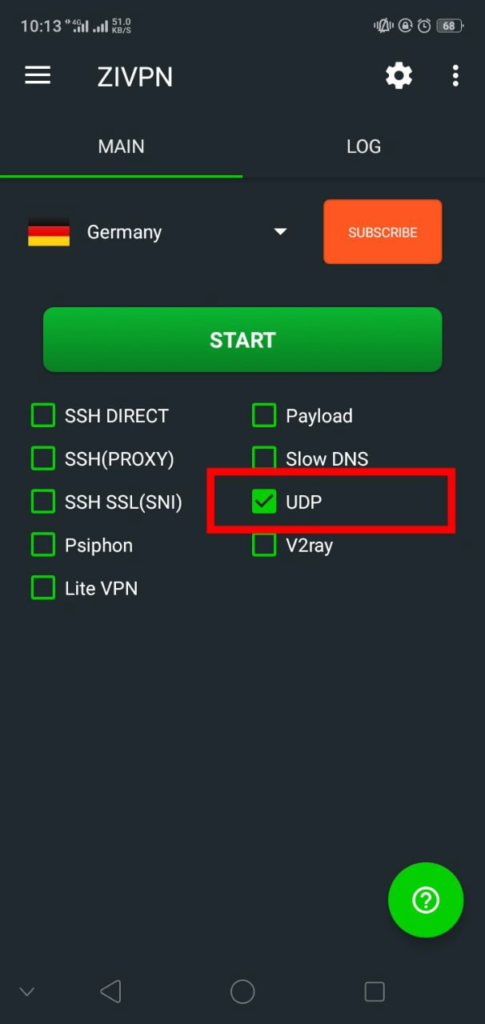
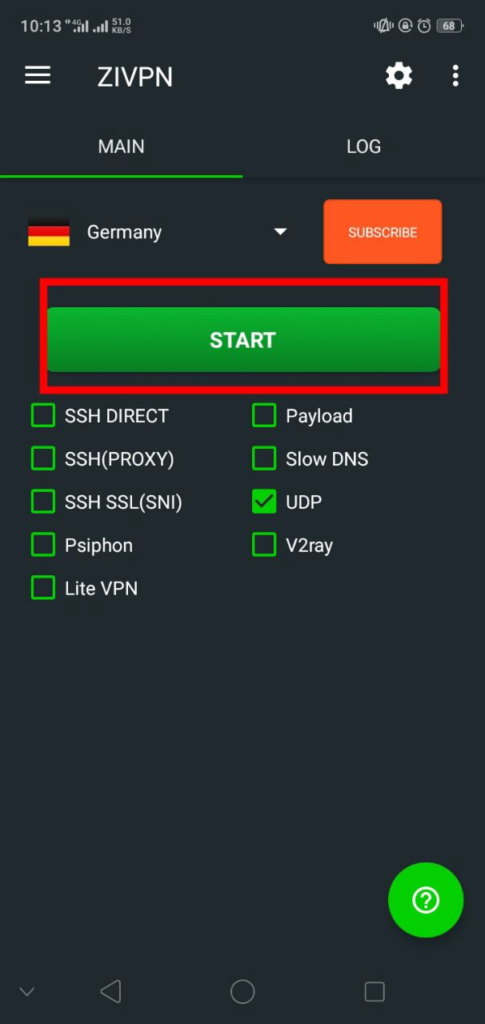
With your server details ready, return to the ZIVPN app. On the home screen, you will see different protocol options.
To use your custom server, check the box next to “UDP” to activate the UDP protocol. This protocol is known for its speed and reliability, making it a great choice for most users.
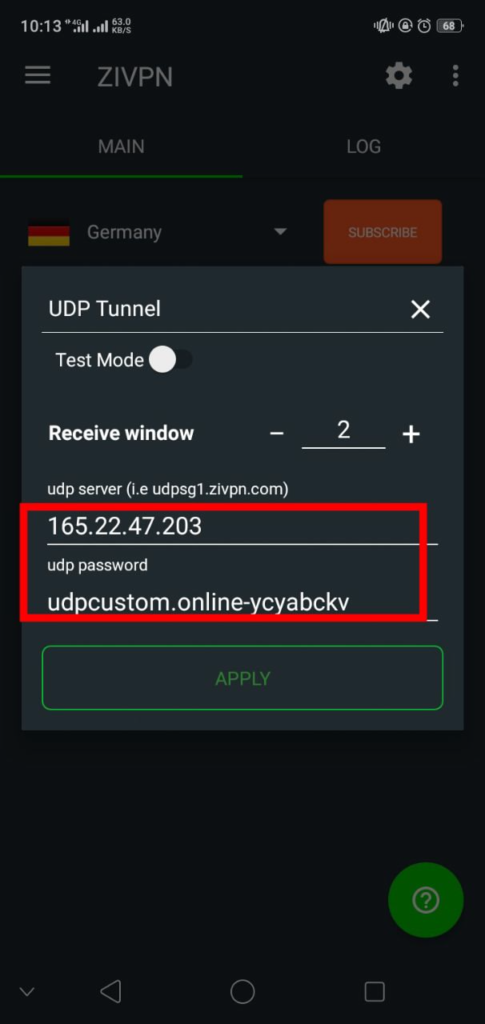
Access UDP Tunnel Settings
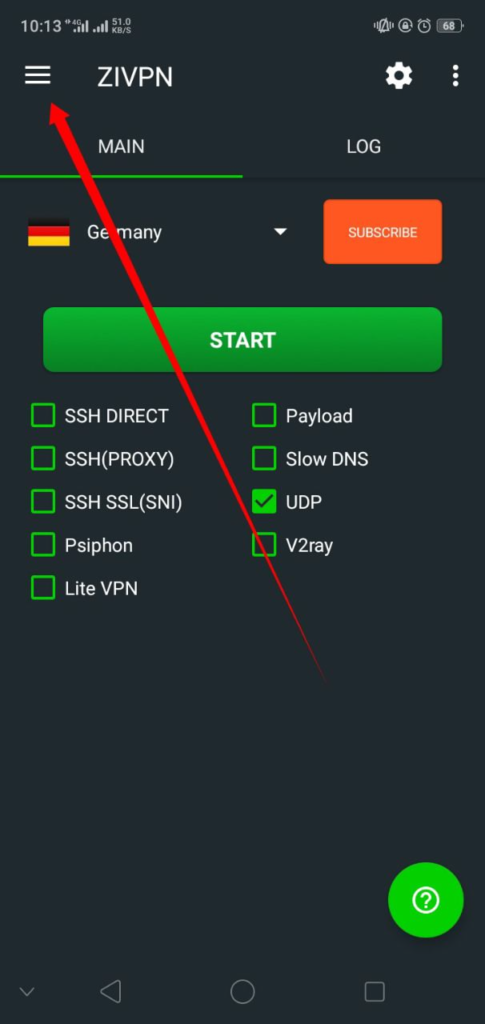
Next, you need to enter the server details into the ZIVPN app. Click on the three-line menu icon on the left side of the screen. From the list of options, select “UDP Tunnel Settings.” This will open a form where you can input the server details.
Enter Server Details
In the form that appears, input the IP address and password of the server you created. Make sure all the details are entered correctly. Once you have filled out the form, click “Save” to proceed. This step configures the app to connect to your custom UDP server.
Connect ZIVPN
Finally, it’s time to connect to the VPN. Go back to the home screen of the ZIVPN app and click the “Start” button to connect to the VPN. You can view the VPN logs to confirm that the connection has been successfully established. Once connected, you can enjoy a secure and fast internet browsing experience.
Conclusion
By following these steps, you can easily set up a custom UDP server on ZIVPN, ensuring a secure and efficient VPN connection. ZIVPN’s support for the UDP protocol makes it an excellent choice for users who prioritize speed and security. For more detailed tutorials and guides, be sure to follow our blog and subscribe to our channel. Thank you for reading, and happy browsing!
FAQs
Q1: Why should I use ZIVPN with UDP protocol?
The UDP protocol is known for its speed and efficiency, making it ideal for activities that require real-time data transfer, such as gaming and streaming.
Q2: Can I use this guide for other VPNs?
This guide is specifically tailored for ZIVPN. While some steps may be similar for other VPNs, it’s best to refer to the documentation specific to your VPN provider.
Q3: What if I encounter issues during the setup?
If you encounter any issues, double-check the server details you entered and ensure you followed each step correctly. You can also refer to ZIVPN’s support resources for additional help.
Q4: Is there a cost associated with creating a premium UDP server?
Yes, creating a premium UDP server typically involves a subscription fee. Check the UDP Custom website for detailed pricing information.
Q5: How can I ensure my connection remains secure?
Ensure that your VPN app is always up to date and use strong, unique passwords for your VPN and account settings.
By following this comprehensive guide, you can make the most of ZIVPN’s capabilities and enjoy a seamless, secure online experience. For any further questions or detailed tutorials, visit our blog or subscribe to our channel.
