In today’s digital age, protecting your online privacy is more crucial than ever. Using a VPN (Virtual Private Network) is one of the best ways to secure your internet activities. Anonytun VPN is a popular choice due to its advanced features and ease of use. This guide will walk you through the process of setting up Anonytun VPN custom settings, including HTTP proxy, HTTP headers, and SSL settings. Follow these steps to ensure your online activities remain private and secure.
Table of Contents
- Download and Install Anonytun VPN
- Launch Anonytun VPN
- Access Stealth Settings
- Choose a Protocol
- Configure TCP Protocol
- Set Up HTTP Headers
- Configure SSL Settings
- Connect to VPN
- Conclusion
- FAQs
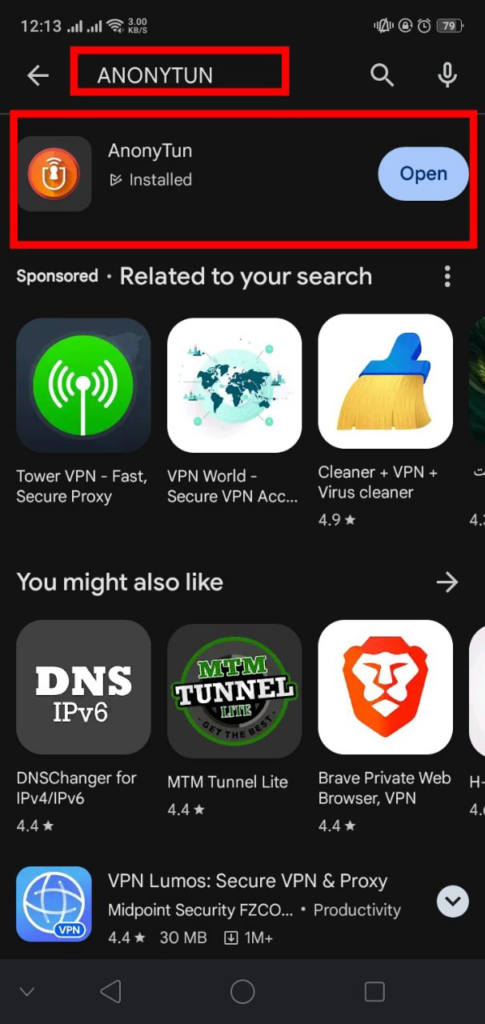
Step 1: Download and Install Anonytun VPN
To get started, open the Google Play Store on your Android device. In the search bar, type “Anonytun VPN.” Once the search results appear, select Anonytun VPN and click “Install.” The app will be downloaded and installed on your device in a few minutes.
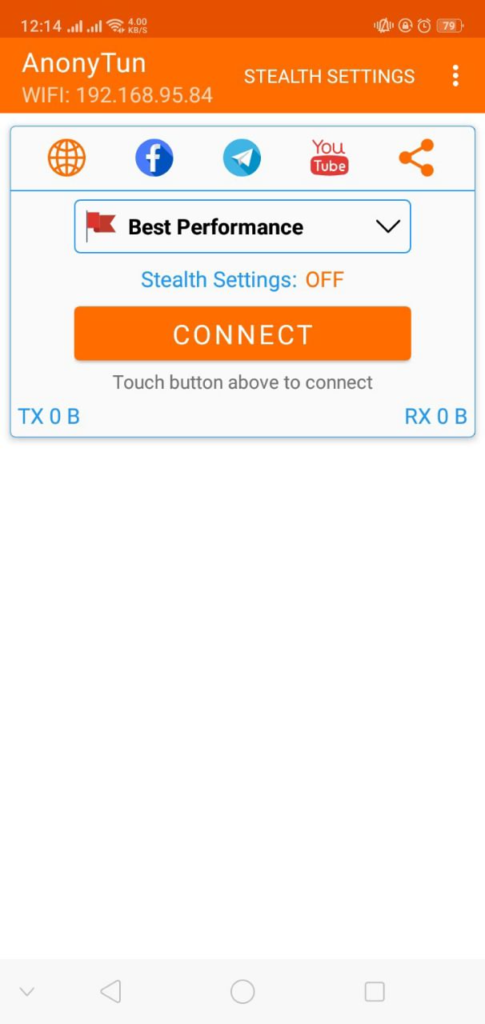
Step 2: Launch Anonytun VPN
After the installation is complete, open the Anonytun VPN app. You will be greeted with the home screen, which displays various options and settings.
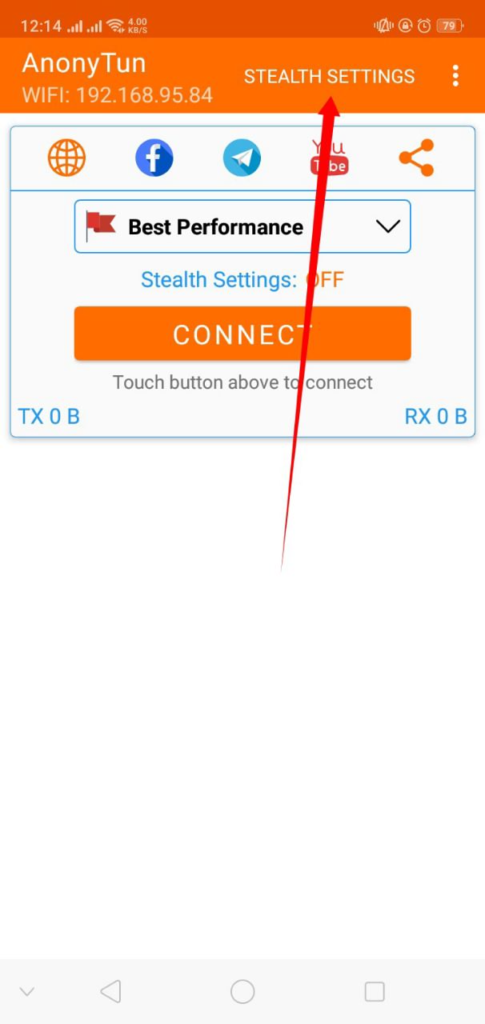
Step 3: Access Stealth Settings
On the Anonytun VPN home screen, locate the “Stealth Settings” option at the top right corner. Click on it to access the advanced settings where you can customize your VPN connection.
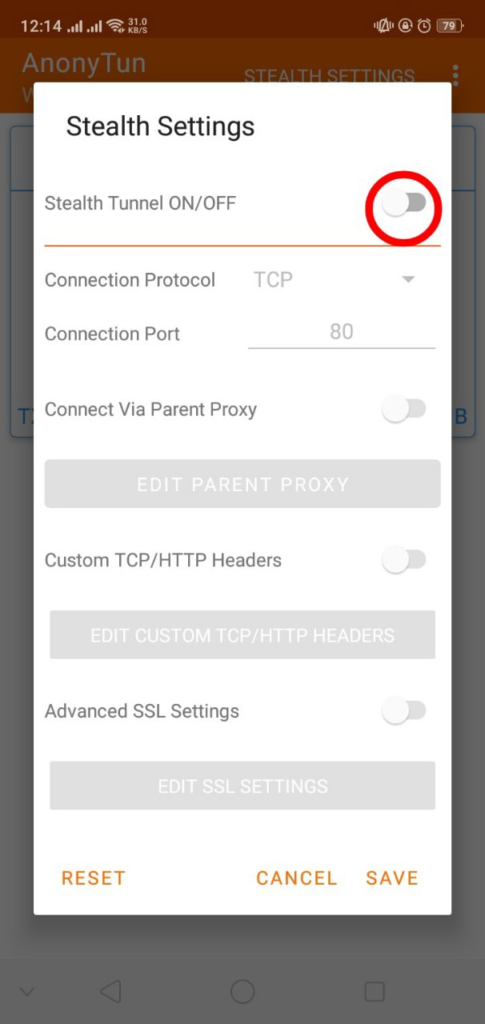
Step 4: Choose a Protocol
Inside the Stealth Settings menu, you will see several protocol options, including TCP, HTTP, and SSL. For this tutorial, we will focus on the TCP protocol, which is compatible with both HTTP and SSL.
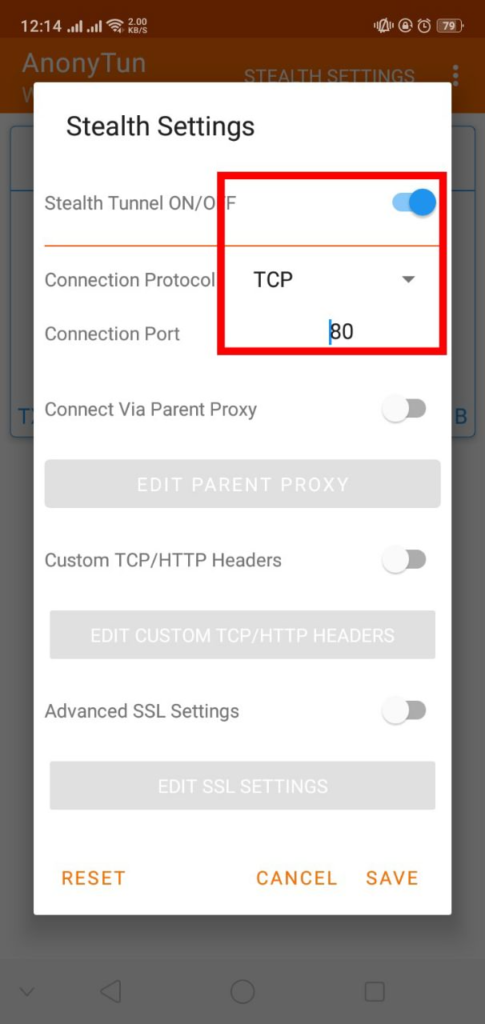
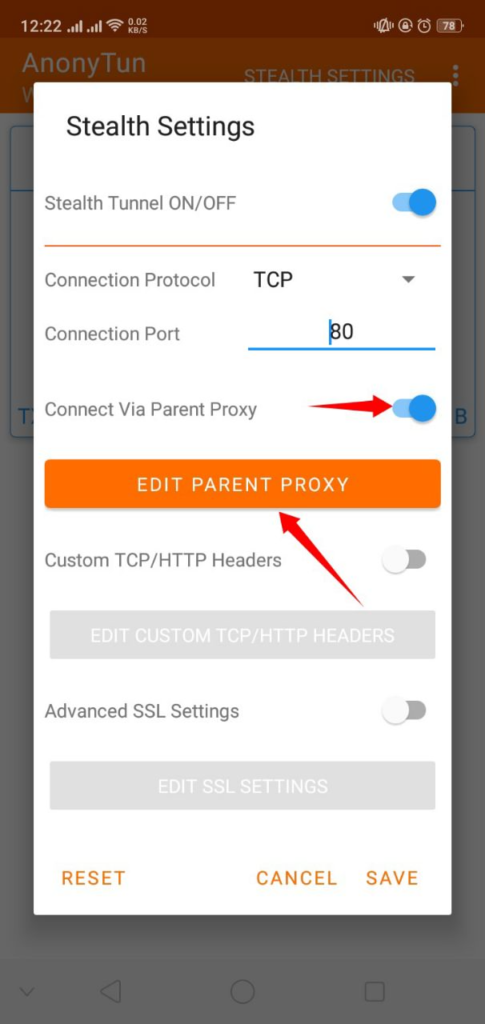
Step 5: Configure TCP Protocol
Select the TCP protocol from the list. After selecting TCP, enable the HTTP proxy settings by toggling the radio button. Next, click on “Edit Parent Proxy.” A pop-up box will appear where you need to enter a working proxy along with its port number. This setup helps route your internet traffic through a specific proxy server, enhancing your privacy.

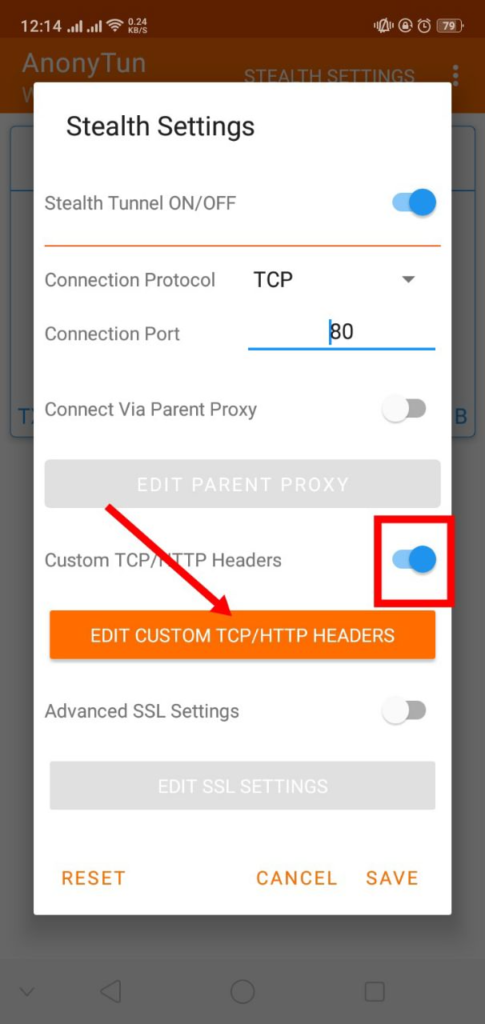
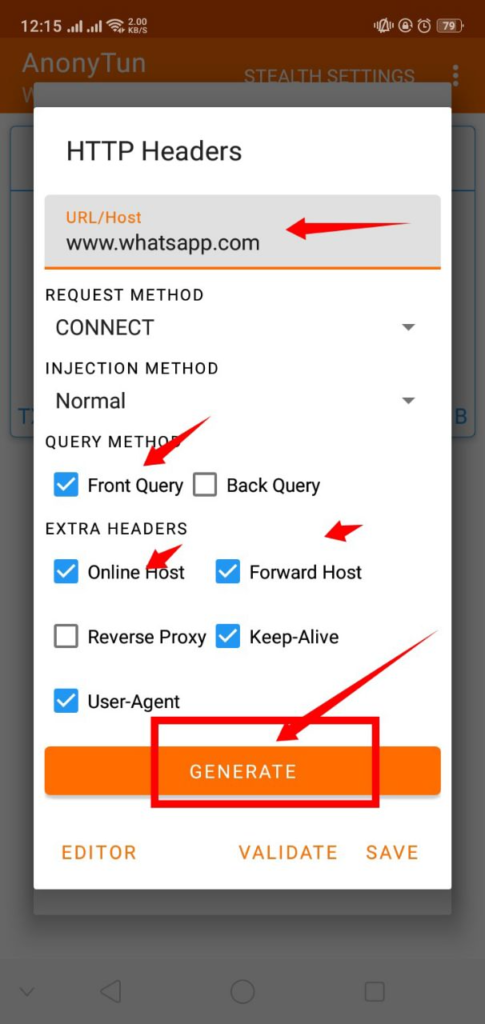
Step 6: Set Up HTTP Headers
If you prefer using HTTP headers instead of a proxy, you can easily configure this option. First, enable the HTTP header settings by toggling the switch. Then, click on the “Edit” button to access the settings. In the new pop-up field, enter a host or header by clicking on the editor button. Once you have entered the required information, click “Save” to return to the previous screen. You can use both headers and proxy simultaneously for added security.
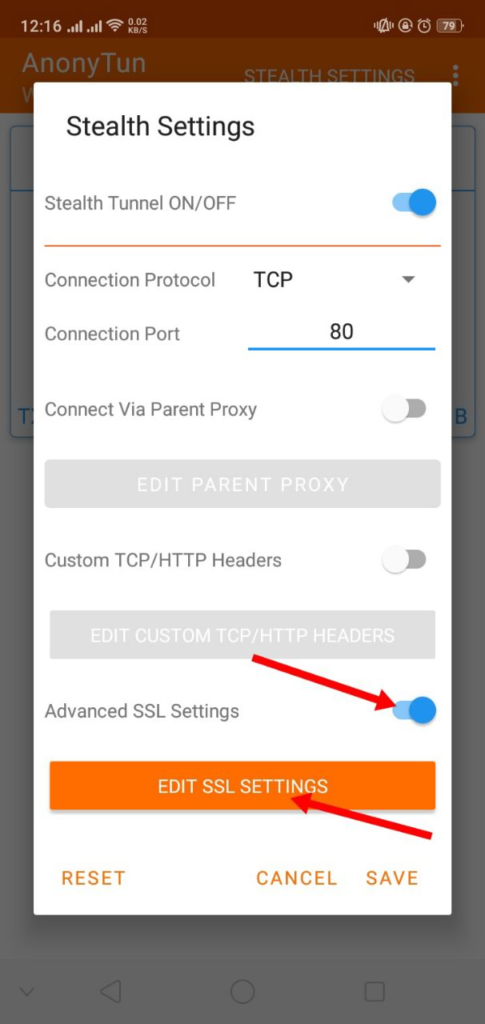
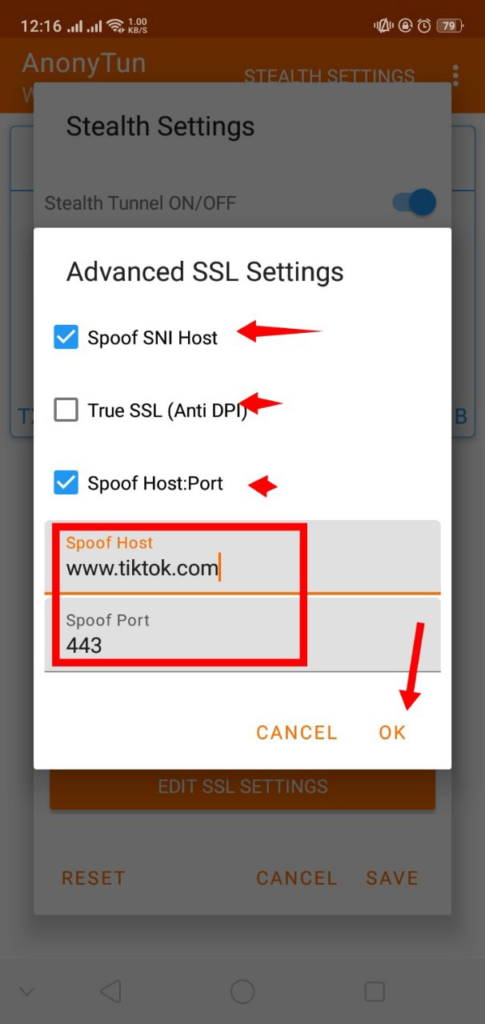
Step 7: Configure SSL Settings
To use SSL settings, you can select either the TCP protocol or the SSL protocol. For this guide, we will continue with the TCP protocol. Toggle the SSL settings to activate them. Click on the “Edit” button to enter the SSL settings. In the new window, you will find fields to enter a custom SNI (Server Name Indication) and port number. After entering the necessary information, click “Save.”
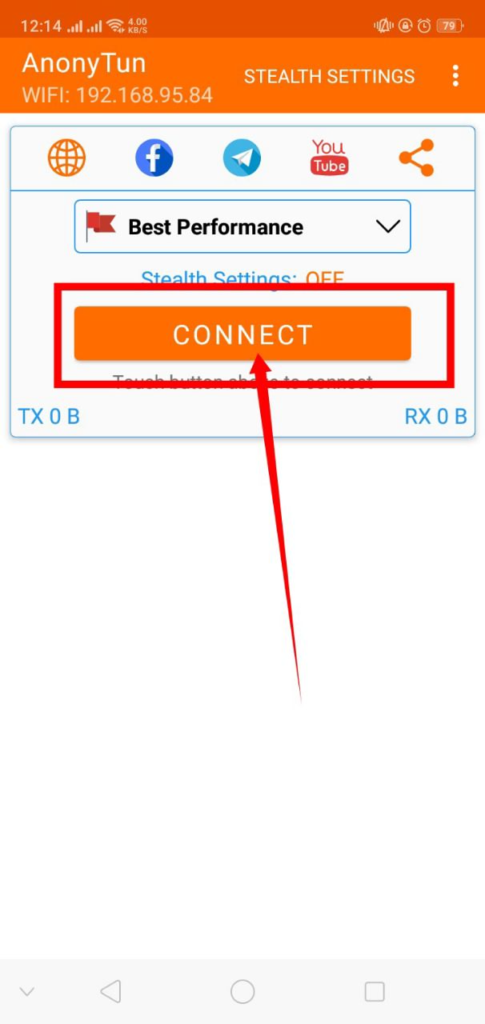
Step 8: Connect to VPN
Once you have configured your desired settings—whether it be HTTP proxy, HTTP headers, or SSL settings—return to the home screen. On the home screen, click on the “Connect” button to start the VPN connection. Anonytun VPN will now secure your internet traffic using the custom settings you configured.
Conclusion
Setting up Anonytun VPN with custom settings is a straightforward process that significantly enhances your online privacy and security. By following the steps outlined in this guide, you can configure HTTP proxy, HTTP headers, and SSL settings to suit your needs. Stay safe online by ensuring your internet activities are protected with Anonytun VPN.
For such detailed tutorials, follow our blog and don’t forget to like, share, and subscribe to our channel. If you found this guide helpful, please share it with others who might benefit from it. Stay safe and secure online!
FAQs
1. What is Anonytun VPN? Anonytun VPN is a Virtual Private Network app that provides secure and private internet connections. It offers advanced features like custom HTTP proxy, HTTP headers, and SSL settings to enhance your online privacy.
2. Why should I use a VPN? A VPN helps protect your online privacy by encrypting your internet connection, making it difficult for hackers and third parties to intercept your data. It also allows you to access content that may be restricted in your region.
3. How do I know if my settings are working correctly? After configuring the settings and connecting to the VPN, you can check your IP address using online tools to ensure it has changed. You can also test the VPN connection by accessing restricted websites.
4. Can I use Anonytun VPN on other devices? Anonytun VPN is primarily designed for Android devices. However, you can look for similar VPN apps with custom settings for other platforms like iOS, Windows, or macOS.
5. What should I do if the VPN connection is slow? If your VPN connection is slow, try switching to a different server or proxy. You can also check your internet speed and ensure that there are no other bandwidth-heavy applications running on your device.
Keywords:
Anonytun VPN, VPN custom settings, HTTP proxy setup, HTTP headers configuration, SSL settings, online privacy, secure internet connection, VPN tutorial, how to use Anonytun VPN, VPN setup guide
Useful Links:
Related Articles:
- How to Setup a Custom Premium UDP Server on ZIVPN
- How to Setup SSH Websocket Server on HTTP Custom VPN
Hashtags:
#AnonytunVPN #VPNSetup #OnlinePrivacy #HTTPProxy #SSLSettings #HTTPHeaders #SecureInternet #VPNGuide
Thank you for reading! If you found this article helpful, please give it a thumbs up and share it with others who might benefit. Don’t forget to subscribe to our channel for more tutorials on online security and privacy. Stay safe online!
